Continuous integration (CI) is traditionally used for testing software and also optionally deploying the code to be executed on a different server. However, I sometimes want to be able to have the CI job commit changes back to the Git repository that initially triggered the CI build. For example, if I have automated a data analysis, I want the latest version of the report to be committed back the repository. Another example is committing the latest version of the documentation (e.g. to the gh-pages branch of a GitHub repository).
As I mentioned in my first post on using CircleCI, I have found that configuring CircleCI to commit back to a Git repository to be easier compared to other CI platforms. Below I detail the steps required.
Initial setup
This post assumes you already have already done the following:
- Created a GitHub repository
- Activated CI builds for the repository on CircleCI
If you haven’t done this, see the CircleCI documentation Getting Started.
Overview and terminology
The overall goal is to automatically save some artifact generated by a CI job (e.g. report, plot, documentation).1 To accomplish this, the main challenge is authenticating the CI server to be able to commit to your repository on your behalf.
In this post, I will detail how to setup an SSH deploy key with write access to your repository. I recommend this method because it is straight-forward and secure. If your private key gets exposed (e.g. accidentially printing it in a CI log), an attacker would only gain access to that one repository. In a later section, I briefly explain alternative authentication options.
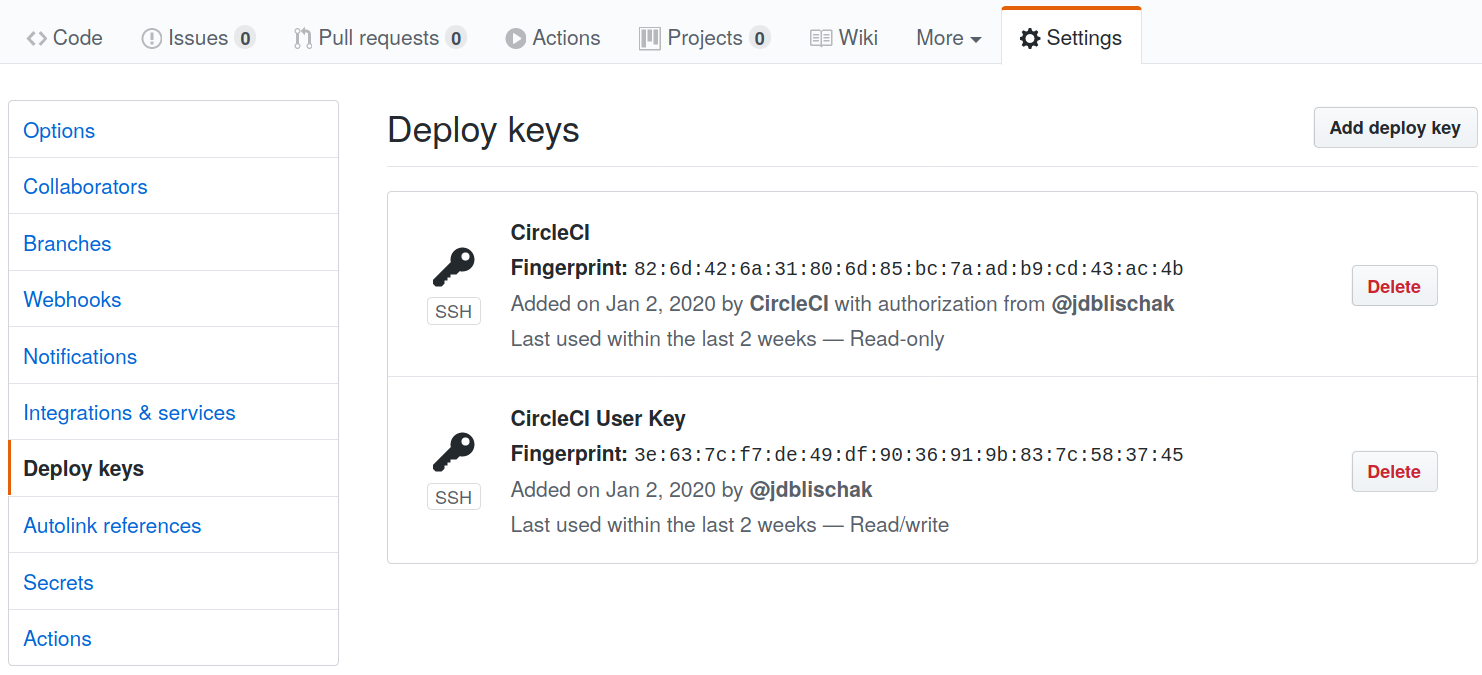
You already have one deploy key setup for your repository. When you activate
CircleCI to build a GitHub repository, it automatically adds a key to the GitHub
repository. In fact, you probably received an email from GitHub with the title
“A new public key was added to <account>/<repository>” alerting you
to the fact that this happened. You can navigate to view the key on GitHub by
going to Settings -> Deploy Keys. Note that this key is named “CircleCI”.
Importantly, it is “Read-only”. This means that CircleCI currently only has
permission to read from the repository. If you add a git push to your CI job,
it will fail with an authentication error.
Thus you need to generate a new pair of SSH keys. You will add the public key to your GitHub repository as a deploy key with write access. Next you will add the private key to the corresponding project on CircleCI. Lastly, you will update the CircleCI configuration file so that it pushes to GitHub. Each of these steps is explained below.
Generate one-off SSH keys
First you need to create some one-off SSH keys that will only be used by
CircleCI to authenticate with this one GitHub repository. You can follow the
standard instructions from GitHub for generating a new SSH
key. However, there is one main difference. You will
immediately delete the key from your local computer afterwards, thus you want to
make sure you don’t break your current setup. If you already have SSH keys on
your machine, they are likely in the default location: ~/.ssh/. 2 You can use the flag -f to specify the location of
the output key files. Run the commands below to generate new SSH keys.3 When asked for a passphrase, press enter twice to not add
a passphrase to the key.
mkdir /tmp/ssh-temp/
ssh-keygen -t rsa -b 4096 -C "CircleCI Deploy Key with Write Access" -f /tmp/ssh-temp/key
This created the private key /tmp/ssh-temp/key and the public key
/tmp/ssh-temp/key.pub.
In order for the key to work, it must be in PEM format. Confirm this by
running the code below. The first line of the private key field must be
-----BEGIN RSA PRIVATE KEY-----.
head -n 1 /tmp/ssh-temp/keyIf your version of ssh-keygen didn’t produce that line verbatim, delete the
keys and re-run the command with the additional flag -m PEM.
Add the public key to GitHub
Next navigate to your repository on GitHub. Click on Settings and then select
“Deploy keys” from the menu on the left. You should see that there is already a
“Read-only” key named “CircleCI”. Click “Add deploy key”. You can name it
whatever you like.4 Then copy-paste the contents of the public key
/tmp/ssh-temp/key.pub into the Key field. Lastly, check the box “Allow write
access” so that CircleCI can push back to GitHub.
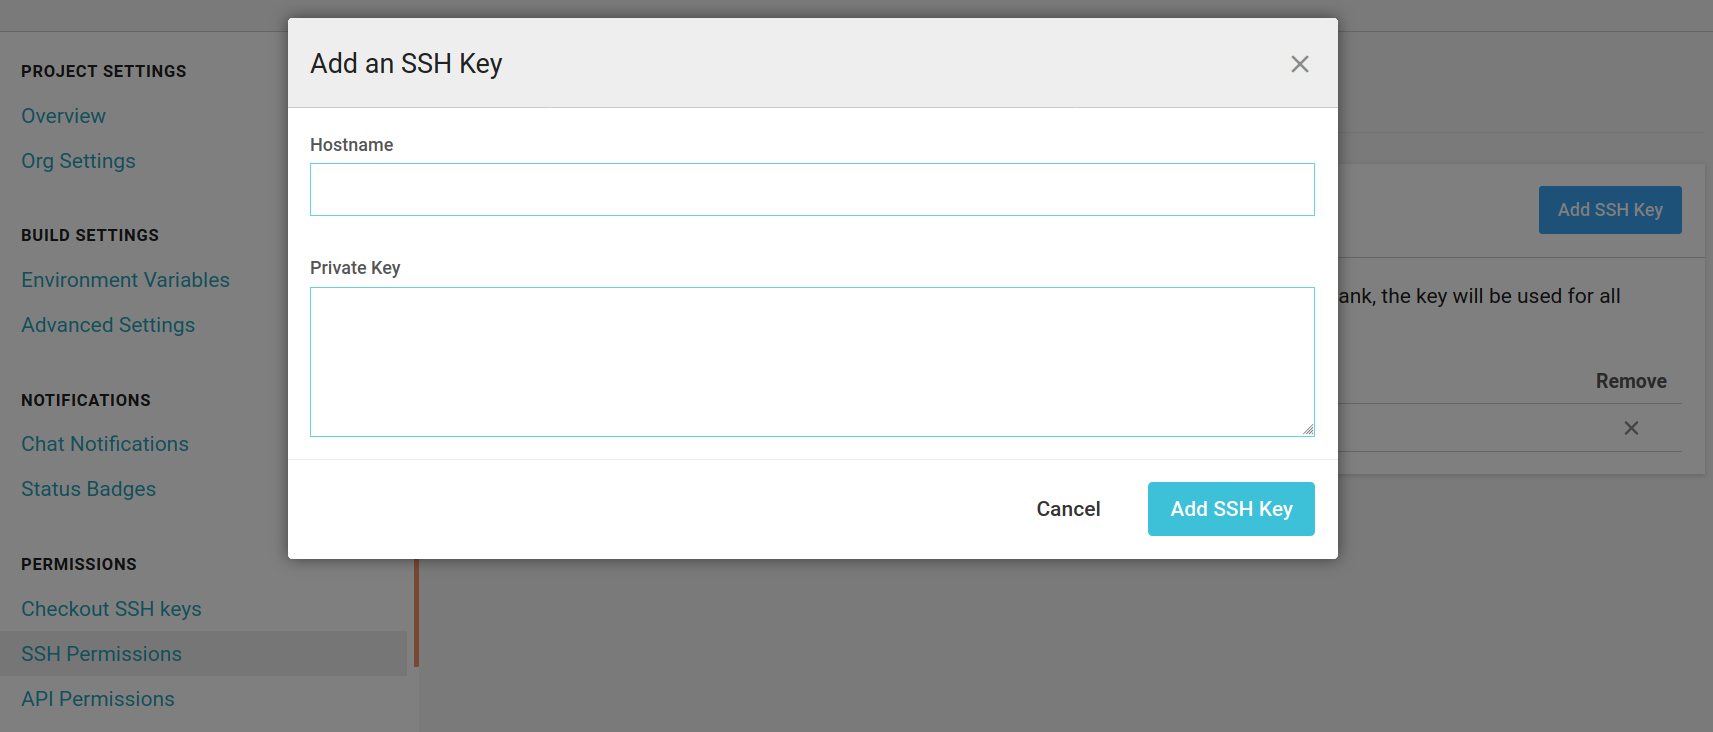
Add the private key to CircleCI
Next navigate to the project on CircleCI. The URL follows the pattern:
https://circleci.com/gh/<account>/<repo>.5
Don’t click on the “Settings” in the menu on the left. That is for user
settings. Instead, click on the gear icon in the top right. Then choose “SSH
Permissions” and “Add SSH key”. For the Hostname put “github.com” 6. Copy-paste the private key in /tmp/ssh-temp/key into the field
“Private Key”. As the name implies, it is really important that you do not
expose this key.
Add the fingerprint to configuration file
After adding the private key to CircleCI, you will see it displays a fingerprint
for the key. You will need to add this key to the configuration file
.circleci/config.yml in your repository using the step add_ssh_keys.
Copy-paste the fingerprint into an add_ssh_keys step as shown below:
    steps:
      - checkout
      - add_ssh_keys:
          fingerprints:
            - "<copy-paste-fingerprint-here>"
      - run:
Push to GitHub
Now that CircleCI has permission to push to GitHub, you’ll need to add a step to
do this. It can look something like below. It configures Git, checks out the
master branch,7 commits any
changes to all tracked files, and then pushes to GitHub. The --allow-empty
prevents an error in the case where no files were changed. The [skip ci]
prevents the job from running in an infinite loop due to constantly
re-triggering the CI build.
      - run:
          name: Commit to GitHub
          command: |
            git config user.email "<insert-the-email-you-use-with-github>"
            git config user.name "CircleCI Job"
            git checkout master
            git commit --allow-empty -am "Automatic commit from CircleCI [skip ci]"
            git push origin master
Now you probably don’t want to always attempt to push to GitHub. For example, when CI builds are triggered by a Pull Request. The updated version below requires a specific CircleCI user account and that it is not a Pull Request. Otherwise it doesn’t attempt to commit.
      - run:
          name: Commit to GitHub
          command: |
            if [[ "${CIRCLE_USERNAME}" = "<account>" && -z "${CIRCLE_PULL_REQUEST}"]]
            then
              echo "Committing to GitHub"
              git config user.email "<insert-the-email-you-use-with-github>"
              git config user.name "CircleCI Job"
              git checkout master
              git commit --allow-empty -am "Automatic commit from CircleCI [skip ci]"
              git push origin master
            else
              echo "Not committing to GitHub"
            fi
Commit this update to the local configuration file and then push to GitHub. This time the build should result in a new commit to the repository.
If you receive an error due to a message such as the one below:
The authenticity of host 'github.com (192.30.253.113)' can't be established.
RSA key fingerprint is SHA256:<fingerprint>.
Are you sure you want to continue connecting (yes/no)?
You can bypass it by manually adding GitHub to the list of known SSH
hosts prior to running git push:8
ssh-keyscan -t rsa github.com >> ~/.ssh/known_hostsDelete the local SSH key files
Once you’ve confirmed everything is working as expected, delete the one-off SSH keys from your local machine:
rm -r /tmp/ssh-temp/Conclusion
Now any time you want CircleCI to automatically update the results of an analysis or documentation files for a GitHub repository, you can follow these steps to setup the authentication.
Lastly, I’ll note that a powerful combination is to schedule the workflow to be run on CircleCI at regular intervals. Then the repository will stay up-to-date without requiring any intervention.
Alternative authentication options
There are alternative options for authentication:
GitHub Personal Access Token (PAT): You could generate a GitHub PAT, either for your own account or a bot account, with the required scope to write to your repository (
public_repofor a public repository,repofor a private repository). You would then define this as an environment variable in your CircleCI build (e.g.GITHUB_PAT), which would authenticate you to push to your repository using the following URL pattern:https://<account>:$GITHUB_PAT@github.com/<account>/<repo>.git. I dislike this option because it is not possible to limit the scope of a PAT to a single repository. In other words, if a PAT with write permissions is exposed, it gives write access to every repository owned by that account. Update (2022-10-03): Even though GitHub has disabled password-based HTTP authentication, I confirmed that it is still possible to perform PAT-based HTTP authentication from a CI build.SSH user key: CircleCI has a convenient option to register a user key. In the CircleCI project settings page, choose “Checkout SSH keys” and then “Authorize with GitHub”. This will add a public key to your GitHub account, and CircleCI keeps the private key. Now your CI build will be able to access all of your public and private repositories on GitHub. I recommend this option if your CI build needs write access to multiple repositories (or read access to multiple private repositories). If you only need write access to the one repository, it is more secure to use a deploy key since it has limited access to your account.
If you want to create a user key, you can automate this even more using the R package ropenscilabs/circle developed by Patrick Schratz. It requires some initial setup: 1) generate a CircleCI API key and save it in
~/.RenvironasR_CIRCLE, and 2) generate a GitHub PAT and save it in~/.RenvironasGITHUB_PAT. Then the user key can be created with the functionuse_circle_deploy().
Links to further documentation
- GitHub
- CircleCI
- My previous posts on CircleCI
Version control purists will object to saving generated content in a version control repository. And sure, if you are a part of a team working on a large enterprise codebase, you would be wise to save generated content on a separate server for sharing with others. But for individuals or small teams with fewer resources, saving generated content in the original Git repository is a practical choice with plenty of benefits: keep everything in one place, serve HTML files with GitHub Pages, record history of changes, etc.↩
WARNING: Do not be tempted to use your existing SSH keys. If an SSH key linked to your GitHub account is exposed, an attacker would have access to all of your public and private repositories.↩
The comment passed to
-Ccan be whatever you like. It’s purpose is to remind you what the key is for.↩In the screenshot below, you can see that I named it “CircleCI User Key”. This is because at the time I was confused by the CircleCI documentation (which I have since fixed). It is a deploy key since it is associated with a single repository. A user key is one that is assoiciated with a user account.↩
For convenience, I recommend the Firefox addon Open CircleCI Workflows. Whenever you have a GitHub repository open in your browser, it inserts a button with the CircleCI logo into the address bar. Clicking on this button takes you directly to the project on CircleCI.↩
Update: I had originally said that you could put whatever you like in the Hostname field to remind you that this key is for pushing to GitHub. However, SampsonM kindly took the time to inform me that it actually has to be “github.com”, and I confirmed this is what the CircleCI docs state.↩
By default it is in detached HEAD state.↩
This can be a security concern. If you’re concerned, e.g. you are pushing sensitive data to a private repository, you can confirm the fingerprint in the CircleCI build log matches the fingerprint published in GitHub’s SSH help page.↩